How to Needle Felt Bugs Tutorial for Beginners
How to Needle Felt Cute Bugs: A Fun Spring Project for the Whole Family!
There’s something truly magical about turning fluffy wool into whimsical little creatures, especially cute bugs that can bring a smile to anyone’s face. As spring arrives here in Tennessee, with warmer days, blooming flowers, and everything coming back to life, we are spending a ton of time outdoors. My little guy loves to find all the bugs he can, and he’s always a little bummed that we can’t keep them indoors. I thought it was the perfect opportunity to needle felt cute bugs he can actually play with inside and out.

We love heading to the backyard to spot real worms wiggling through the soil after a rain, ladybugs on our lamb’s ear leaves, spiders spinning their webs, or honey bees buzzing around fresh blossoms—we are using our outdoor adventures as inspiration for this easy felt project. It’s a wonderful way to blend hands-on learning about God’s amazing creation with creative play and crafting. These tiny felted bugs make fantastic spring projects: educational, therapeutic, and full of joy as you and your little ones explore the insects awakening in your own backyard. Whether you’re a complete beginner or looking to add some seasonal fun to your crafting routine, this guide will walk you through how to needle felt adorable insects step by step. Note: I do not recommend that little ones do the actual needle felting as this process uses sharp needles.
In this tutorial, we’ll focus on making a fuzzy spider and a cute little worm inspired by our personal favorite -Slimey the Worm (Oscar the Grouch’s cheerful pet from Sesame Street). He’s got orange and yellow stripes and big, expressive personality. These same basic techniques you will learn—rolling, shaping, attaching details, and felting securely—can be used to make any bug you can imagine! A ladybug with red body and black spots, a buzzing bee with yellow stripes and wings, a butterfly emerging like new life in spring, or even a dragonfly— just adjust the colors, add wings or antennae as needed, and let your creativity (and your kids’ observations from the backyard) guide you. We will be doing lady bugs and other insects in a future lesson, so keep your eyes peeled for those tutorials HERE. Let’s get to making good things—grab your supplies and let’s felt some cute bugs!
Why Needle Felt Cute Bugs in Spring? Benefits for Beginners, Families, and Little Learners
Before we jump in, let’s talk about why needle felting cute bugs is such a rewarding spring project. Not only is it therapeutic (that repetitive poking motion is oddly satisfying!), but it’s also budget-friendly and versatile. You can customize your bugs with colors and details to match the season—think vibrant spring hues inspired by the insects emerging in your backyard.
I love how this craft encourages us to appreciate the intricate designs God placed in nature, from a spider’s web in the morning dew to a worm’s role in enriching the soil. Spring is ideal for this: take a nature walk with your kids to observe real bugs (like earthworms after rain or ants marching in formation), then recreate them in wool. It turns learning into play—teaching so many things: life cycles, pollination, or how bugs help our gardens—while building fine motor skills and sparking wonder. If you’re new to felting, bugs are great starters because they’re small and forgiving.
Materials You’ll Need for Needle Felting Cute Bugs
For my complete list of needle felting supplies, click HERE.
Below are the basic supplies you’ll need for this particular craft.
• Wool roving in various colors (black for the spider body, white for eyes and legs, orange and yellow for Slimey the Worm, plus reds, greens, etc., for other spring bugs)
• Felting needles (a medium-gauge like 38-star is ideal for beginners)
• Felting mat or foam pad to protect your surface
• Pipe cleaners (white for spider legs; optional for worm details or antennae on other bugs)
• Small beads or felt balls for eyes
• Scissors and optional glue for securing details
Pro tip: Start with a needle felting kit if you’re just beginning—it often includes everything you need for cute bug projects, and it’s great for family crafting sessions!
Step-by-Step Guide: How to Needle Felt a Cute Spider
Let’s begin with the spider, a fun bug that’s often spotted in spring webs glistening with dew—perfect for backyard exploration!
1. Prepare the Body Base: Start by rolling a small amount of black wool roving into a loose ball, about the size of a golf ball. Place it on your felting mat. Using your felting needle, begin poking the wool repeatedly to compact it into a firm, round shape. The key is to poke straight in and out to avoid breaking the needle—think of it as sculpting with pokes!
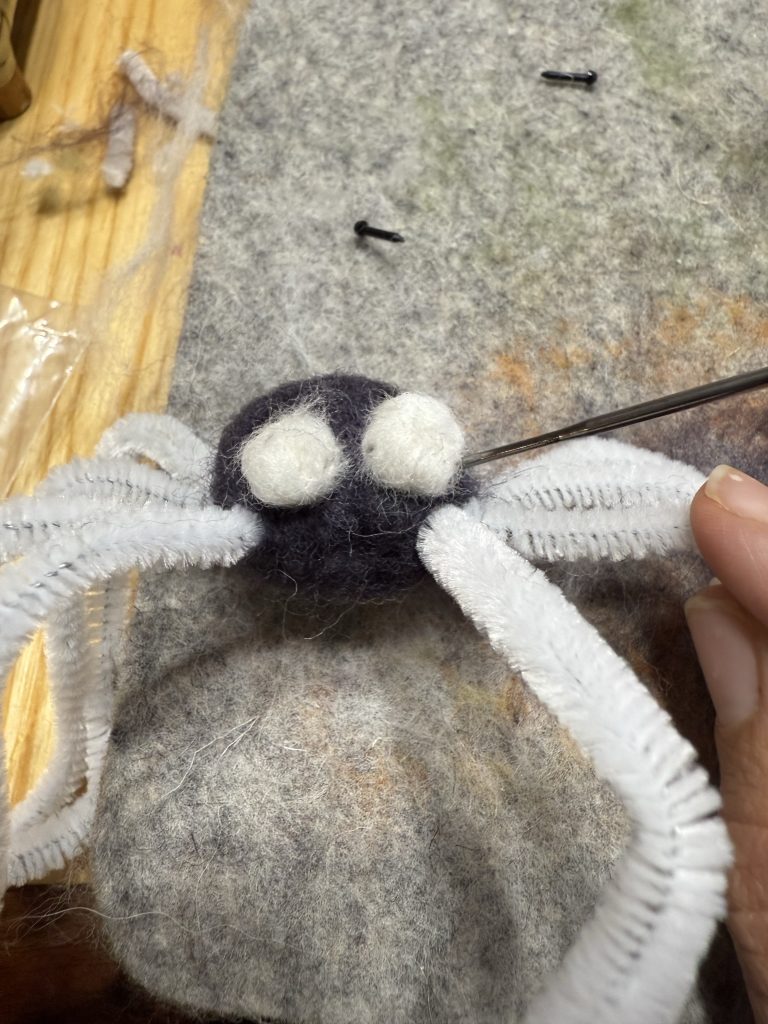
2. Add the Legs: Cut white pipe cleaners into four equal lengths for the legs. They will be bent in half at the spider body to make eight legs. Wrap them around each other to create a single bundle of legs. Bend them slightly at the ends to make feet. Attach them to the body by wrapping a bit of wool around the middle connection point of the legs and felt it securely into the black ball. As you can see in this photo of my spider in progress, I’m using the needle to attach, poking wool fibers to blend them seamlessly. The fuzzy texture of the pipe cleaners adds instant cuteness!
3. Create the Eyes and Details: Roll tiny bits of white wool into balls for the eyes and felt them onto the front of the body. Add small black beads for pupils by poking them in gently. For extra personality, felt on a little mouth or patterns if desired. Poke all over to firm up the shape—your spider should now look firm and adorable!
Step-by-Step Guide: How to Needle Felt Slimey the Worm (or a cute caterpillar)
Now, onto Slimey the Worm—Oscar’s adorable pet from Sesame Street! He’s a cheerful, striped worm with big eyes and a big smile, and what better spring bug to felt than a worm? Kids can dig for real earthworms in the garden or hunt for caterpillars, then craft their own Slimey worm friend to love on.
1. Form the Body Segments: Take orange wool roving and roll into a small sausage shape. Take strips of yellow to felt onto the orange log, alternating colors for Slimey’s signature stripes (orange base with yellow bands). Felt each segment lightly on the mat, then connect them by overlapping the ends and poking to join.
2. Add Facial Features: At one end, shape a rounded head with extra orange wool. Poke holes for tiny black plastic eyes. Felt an orange wool flap for a mouth and felt a small pink wool piece inside for his tongue—attach carefully in place with a needle to secure.
3. Refine and Finish: Go over the entire body with your needle to smooth out any loose fibers. Let your creativity shine—these techniques work for any worm or bug variation!
Tips for Success in Needle Felting
• Safety First: Felting needles are sharp, so work slowly and keep them away from little hands—perfect supervision project for older kids!
• Troubleshooting: If your wool isn’t felting well, add more pokes or try a coarser needle. Practice on scraps first!
• Customization Ideas: Use the same rolling, shaping, and attaching methods to create any spring bug you spot—add wings for butterflies, spots for ladybugs or antennae for ants.
• Storage and Care: Store your felted bugs in a dry place to keep them fluffy. They’re not machine washable, so spot-clean if needed.
There you have it—a simple, yet magical way to bring bugs to life this spring. These little critters can brighten your little one’s play space, spark backyard adventures, and make thoughtful gifts or learning tools. I hope this tutorial inspires you and your little ones to get outside, observe God’s tiny creations, and then felt your own versions. If you try this project, I’d love to hear about it—share your creations (and backyard bug finds!) in the comments or tag me on social media. Remember to enjoy the process. Let’s keep making good things together this spring!
For more beginner needle felting ideas, check out my posts on Cute Needle Felting Animal Projects for Beginners or The Best Needle Felting Books. Happy felting—and happy bug hunting! 🐛🌸