How to Make A Ceramic Berry Bowl Clay Tutorial
Last summer, I was out in the backyard, as usual, with my son. We were harvesting blueberries off of our bush, and I realized I needed a berry bucket of sorts to collect them in. I wanted something better than a plain old Tupperware container, but it needed to work like a colander for rinsing those juicy berries. That’s when I decided to throw my own ceramic berry bowl.
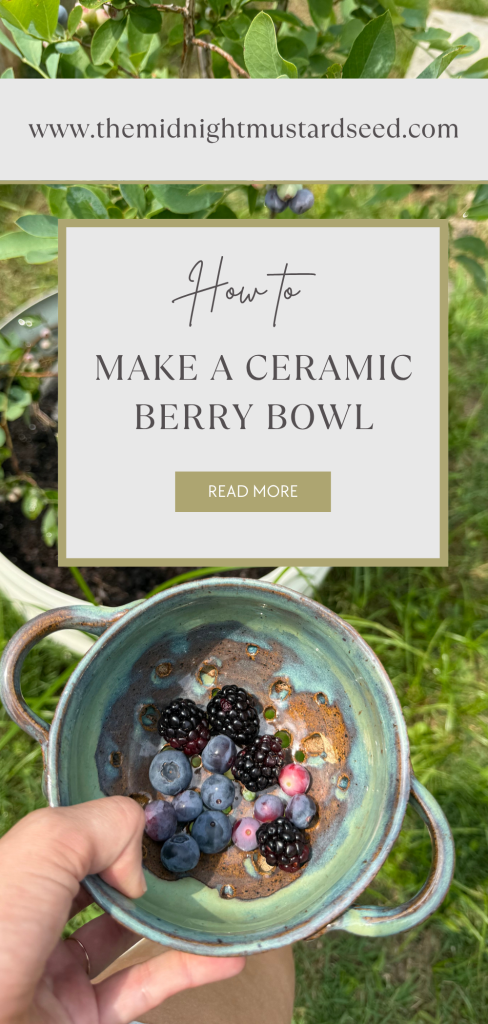
These aren’t just pretty pottery for your collection-they actually work! The drainage holes let water run right through while the sturdy foot of the bowl keeps everything stable on your counter. No more soggy berries or plastic gadgets cluttering the kitchen. If you are in need of a berry bowl for your summer harvest, you can make your own! You don’t need to have attended ceramic school or own a fancy studio to make them. Not into making things? You can find mine in my Etsy shop HERE. Follow along and you can create your own set of functional ceramic berry bowls that are both beautiful and functional. Let’s get to making good things!
Materials & Best Clay Types:
Here’s what you’ll need for one medium berry bowl (about 6–7 inches wide):
• Best clay types: I recommend mid-fire stoneware (cone 5–6) for these because it’s strong, food-safe after firing, and holds up beautifully to moisture. Avoid low-fire earthenware if you want something durable for daily use. Porcelain works too if you want a more delicate feel, but stoneware is more forgiving for beginners and gives that lovely warm tone under glaze.
• Wheel (or you can hand-build a simple bowl shape if you prefer—no wheel required! I have a tutorial on that HERE)
• Hole cutter or awl (I use a ¼-inch one for perfect drainage holes)
• Needle tool
• Damp sponge
• Rib tool and trimming tool
• Slip or scoring tool for attaching handles
• Glazes: I layered a few green and teal glazes
• Rolling pin or slab roller (if adding a foot ring)
• Plastic sheet for slow drying
Step-by-Step: Throwing & Shaping Your Ceramic Berry Bowl
1. Center and throw the bowl
Wedge your stoneware clay well (about 1.5 pounds for a medium bowl). Center it on the wheel, open it up, and pull the walls nice and even. I like a gentle curve that flares slightly at the rim. Leave the base a little thicker—we’ll trim the foot of the bowl later.
2. Create the foot of the bowl
Once the clay is leather-hard (about 24 hours, depending on your studio humidity), flip the bowl onto a bat. Use your needle tool to mark a foot ring about ½ inch in from the edge. Trim carefully with a loop tool until you have a clean, stable foot of the bowl that elevates the piece just enough. Smooth everything with a damp sponge—no sharp edges!
3. Add the drainage holes with a hole cutter
This is the fun part that turns a regular bowl into a true berry bowl! While still leather-hard, use your hole cutter to punch 15–20 holes across the bottom inside the foot ring. I space them evenly, but feel free to get creative—cluster a few or stagger them. Clean up any rough bits inside each hole with the needle tool. The holes let water escape when you rinse your berries.
4. Attach handles on the sides:
Roll two small coils of the same clay (about ½ inch thick). Pull them how you would a traditional mug handle, just on a smaller scale. Score and slip the attachment points on the rim. Press one handle firmly into place, then do the exact same thing on the opposite side so they line up perfectly. Gently pull and shape each handle so they curve outward in different directions for a balanced, ergonomic feel. A quick pass with the damp sponge blends the joins seamlessly.
5. Refine and dry slowly
Use the damp sponge one last time to smooth the rim and any fingerprints. Set the bowl under plastic for 5-7 days so it dries evenly and doesn’t crack. Once bone-dry, it’s ready for bisque firing.
Glazing your bowl:
Now it is time to glaze your bowl for the final firing. Brush on your glaze of choice. Be sure it is the correct firing temperature for your clay. Avoid filling any drainage holes with glaze so it doesn’t fill or fuse to the kiln and wipe off any excess on the bottom of your bowl. Fire according to glaze and clay specifications.
The Finished Piece
When you pull your ceramic berry bowl out of the kiln, it’s ready to use! Fill it with fresh berries of different colors, give it a quick rinse, and watch as beauty meets function while the berries get cleaned and dry. Grabbing our berry bowl to pick from the garden each day has become a sweet little tradition that I genuinely look forward to. It’s become my favorite way to bring the garden straight to the kitchen table. I know I will cherish this bowl long after little hands are grown up and no longer grasping summer berries with precious chubby fingers. Find a project that inspires you and serves your life well. Want a few practical pottery ideas? Check out my other tutorials HERE.
Tips for Success & Variations
• If you’re new to the wheel, practice throwing a few simple bowls first—these ceramic berry bowls are forgiving.
• Want a set? Make them in graduated sizes so they nest for storage.
• No wheel? Hand-build using a slump mold over a bowl form, then add the foot ring and holes the same way.
• Always test your glazes on a small tile first—food safe glazes are key!
You did it! Your very own set of ceramic berry bowls is ready to make every summer harvest feel extra special. I’d love to see your finished piece—tag me on Instagram or drop a comment below with which best clay types you chose or what unique glazing techniques you tried. Happy potting, friends! For more clay tutorials, check out my posts on ceramic nesting bowls or easy DIY clay leaf dishes. Let’s keep making good things together.