How to Needle Felt A Cute Bunny Rabbit for Easter
This post contains affiliate links, which means I make a small commission at no extra cost to you. See my full disclosure here.
I’m writing this in January knowing that when I blink my eyes, it’ll be Easter already. Time goes so fast when you’re in those “lost years” of taking care of little ones. It truly is the best time and it is going too quickly! When it comes to holiday decorations or even gifts for kids, it is very easy to accumulate lots of riff raff that takes over your house and feels a bit chaotic. While that is part of having kids, I want to make an effort to be more intentional with my decorations and gifts. I want to create memories and offer things that will be cherished (hopefully) for a long while.
Easter decorations are scant in our house,so I thought I’d try to make a cute needle felted bunny rabbit to add a handmade touch while we celebrate what Jesus did for us. Follow along if you’d like to make one too!
This step-by-step tutorial can be done with any experience level and is even a fun craft for older kids, with adult supervision of course. If you’re brand new to needle felting, you can check out my post all about the basics of this craft HERE. By the end of this craft lesson, you should have a finished bunny to bring a little extra joy to your Easter decor!
Materials:
-needle felting needles (twisted and triangle)
–needle felting foam pad or foam block
–pink wool OR pink felt tip pen
–glass eyes (3mm) OR
–Polymer clay for sculpting your own eyes
-scissors
-glue
*If you ‘re looking for a good needle felting kit, this ONE will have pretty much everything you need!
The first thing we are going to do is sculpt the body/bottom of the bunny. To form our bunny, we are essentially going to attach a head made from a smaller ball of wool to larger balls that will make up the body. Roll your white wool roving into a large bean shape. Taking your needle, felt the basic shape on your felt pad until it is firm. You can do this by stabbing the felt using a multi needle tool or a single felting needle. Once the bunny’s body is in the desired shape (see below), move on to the next step.
Next, we are going to sculpt the bunny’s head. Roll a smaller ball of white wool into a small bean shape that is proportionate to the body. Take your felting needle and felt the fibers until they make a firm head shape. At the base of the head shape, leave the fibers loose. This is where we will attach the head to the body of the bunny. Place the head on top of the bunny’s body. Attach the two pieces by felting the loose fibers of the head to the body of the bunny.
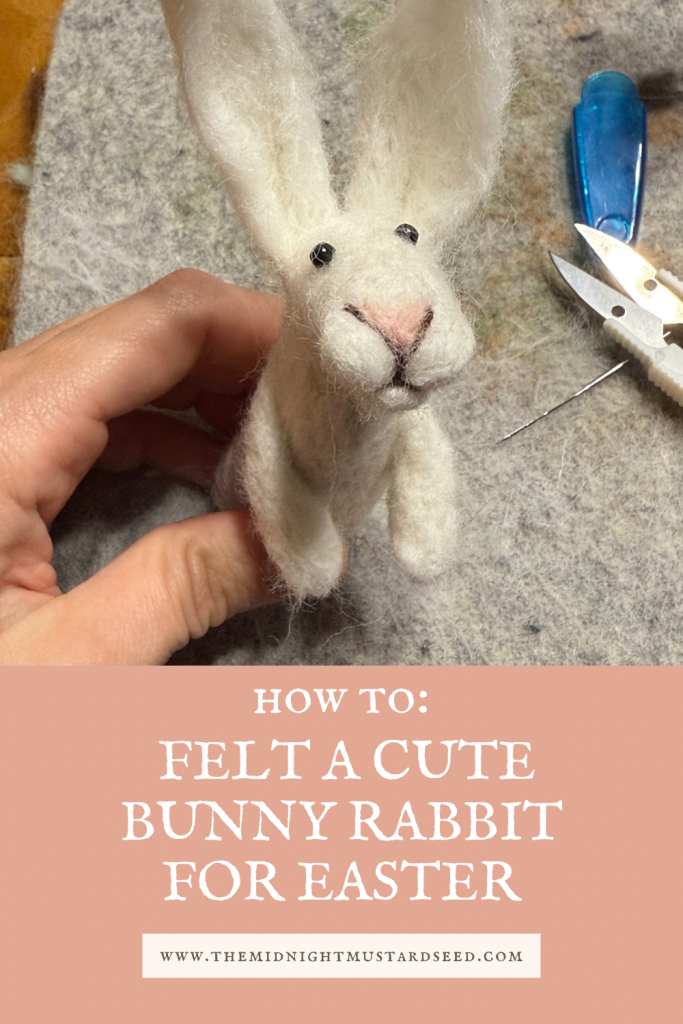
Now we are going to create the bunny’s facial features. To create the cheeks, take two small balls of wool and felt them just under where the nose of the bunny will go. Felt a third small ball underneath the cheeks to create a bottom lip. These smaller balls should be about the third of the size of the head or smaller. Mine are probably smaller than that. They are not to take over the face. They only need to be visible enough to help carve out those facial features. Grab just a pinch of brown wool and twist it into a fine rope. Use this thin line of brown wool to create the mouth and outline of the nose. Felt in place as you go. Add a thin layer of pink wool on the tip of the nose. Taking an awl, poke holes where the glass eyes will go. Glue the eyes into place.
Once the facial features are in place, it is time to sculpt the ears. Take your white wool roving and felt into even sized teardrop shapes. Add dimension to the ears by pinching the top of the ears together and felting together. Repeat this with the base of the ears as well. This will give the bunny ears a more realistic, 3D look. The middle of the ear should appear recessed. Attach the base of the ear to the back of the bunny’s head. Repeat with the second ear.
It is now time to form the arms, legs, and tail of the bunny. For the arms, take your white roving and felt it into two identical, short log shapes. Be sure to leave the fibers of one end of each arm loose to attach to the body. For the legs, felt two log shapes and two circle shapes. Attach the log shapes horizontally to the bottoms of the circles, leaving the top fibers of the circles loose. Attach the legs at the loose fiber ends of the circle shapes. For the tail, roll a little white roving into a round cotton tail. Felt into place. You can finish your bunny at this step, or add a few fun, extra details in the final step.
Decorating Your Felt Bunny
Once your bunny is fully sculpted, it is time to give him a little bit of personality! Add a little felt sweater or a tiny bow tie. Felt a sweet little Easter hat, ear bow, or a springy dress or vest. You could also felt a few felt Easter eggs in the bunny’s tiny hands. The options are limited only to your imagination.
These needle felted bunny rabbits are so sweet and such a fun addition to add to your Easter decor. They also make great handmade Easter gifts to add to your child’s Easter basket. Your little felted rabbits don’t have to be perfect or pristine for your little ones to love them! They are special simply because you took the time to make them with love. It is easy to get wrapped up in gift giving, crafting, or even the Easter Bunny, but the most special part of Easter is that Jesus rose from the tomb for us. Happy Easter! He is risen, indeed!