How to Make Easy DIY Clay Leaf Dishes and Bowls
Crafting DIY Clay Leaf Dishes
Summer is one of my favorite times to be in the studio slinging mud. I am slowly getting back into making pots again, but I am currently switching from a space in my garage to my very own potting shed out back! Since I don’t have access to my full studio just yet, I have been doing little hand-built projects here and there. If you’re looking for a simple summer pottery project or even something to make with air dry clay or polymer clay, making your own leaf dishes is such a magical way to capture some of nature’s beauty.

Why Make DIY Clay Leaf Dishes?
There’s something magical about transforming leaves into functional clay dishes. Whether you choose delicate hydrangea leaves or a bold maple leaf , these earthy DIY projects let you preserve the beauty of nature. Looking for a way to get your little ones involved in this craft? Have them go into the backyard or go with you on a nature walk to forage for a variety of beautiful leaves. You can create trinket dishes or bowls in all different sizes—from a small dish to a larger shallow bowl, depending on the size of your leaves. Plus, crafting with air-drying clay or polymer clay is suitable for all age groups, making it a perfect way for little hands to learn new motor skills and hone their creativity while making a decorative piece or keepsake for your home. Think trinket dish for your bedside table or a small bowl for your entryway!
These DIY clay leaf dishes and bowls are the perfect little dishes for holding small items like jewelry, or keys. You could even use them as incense burners or soap dishes. Using your choice of clay (pottery clay, polymer clay, or air-dry clay) and the delicate shape of foraged leaves, we’ll create trinket dishes and shallow bowls that show off the beautiful impressions of the leaf’s veins and bring organic charm into your home. Grab a cup of tea or coffee, and let’s get our hands dirty!
Note: This post contains affiliate links, which means I may earn a small commission at no extra cost to you. See my disclosure policy for details.
Supplies You’ll Need:
Before we start, we need to grab a few essential supplies.
–Pottery clay, air-dry clay, or polymer clay (depending on your preference)
-Dry leaves (maple, hydrangea, or any with defined leaf’s veins)
–parchment paper or silicone mat
-plastic wrap or old plastic grocery bags
–ceramic glaze ( if you are using pottery clay)
–Matte sealer (optional, for a polished finish)
–Alcohol inks or oil pastels (for color, optional)
-Work surface (a flat surface like a cutting board)
-Small bowl (for shaping)
Step-by-Step Guide to Making DIY Clay Leaf Dishes/Bowls
Let’s roll up our sleeves and get to work!
Step 1: Prepare Your Work Surface
Clean off a work surface to roll out your clay on. Silicone mats or parchment paper work great for easy clean up. Having a mat of some sort down also helps your clay slab not stick to your surface.
Step 2: Roll Out the Clay
Take a ball of your pottery clay, air-dry clay, or polymer clay. Knead it to remove air bubbles, then use a rolling pin to flatten it to about a 1/4 – 1/2 inch thickness (or thinner for a delicate small dish). Aim for an even clay surface that’s slightly larger than your chosen leaf.
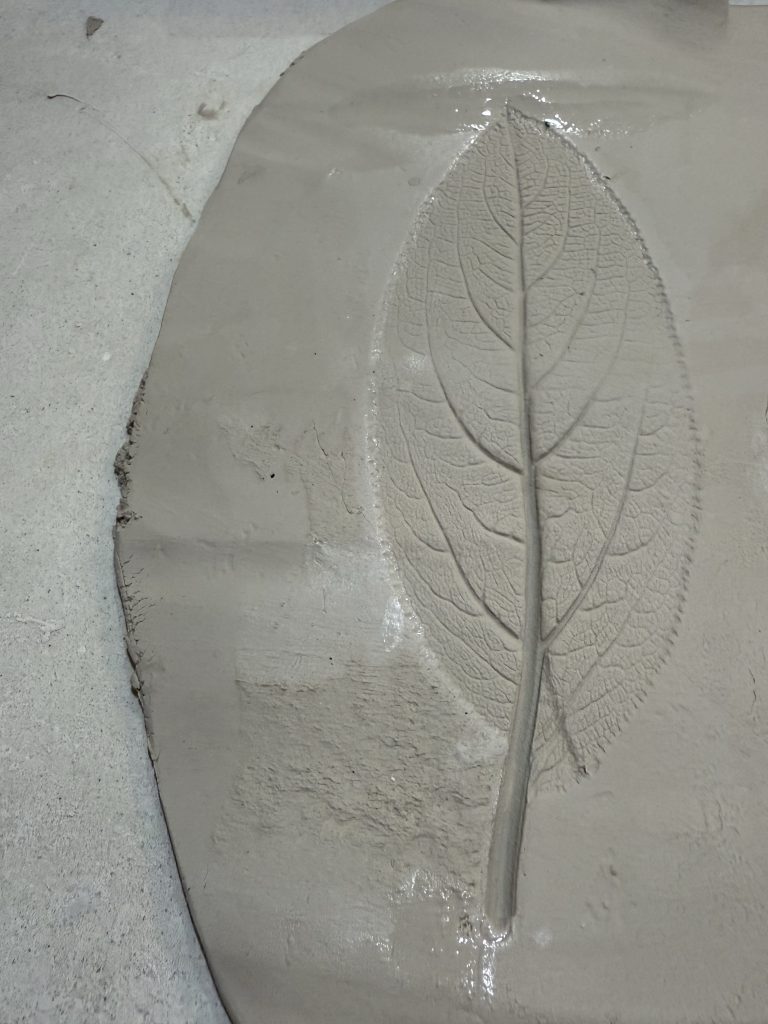
Step 3: Impress the Leaf
Place your dry leaf (vein side down) onto the top of the clay. Gently press it into the clay surface using your rolling pin to capture the outline of the leaf and the intricate leaf’s veins. Be careful not to tear the leaf or push too hard, which could distort the shape of the leaf.
Step 4: Cut the Shape
Using a craft knife or clay cutter, carefully trim around the edge of the leaf to remove excess clay. Peel away the leaf to reveal the imprinted clay leaf dish. Smooth any rough edges with your fingers or a sponge damp with a little water for a more refined look.
Step 5: Shape Your Dish
To create a bowl shape, gently lift the clay leaf dish and place it inside or over a small bowl lined with parchment paper (to prevent sticking). For a shallow bowl or trinket dish, press lightly to form a curved shape. For flat little dishes, leave it on a flat surface. You can also pinch around the rim of your flat dish to create a slight edge on it. Create a small hole in the center of a dish to hold a stick of incense if you’d like. These little dishes can serve any function you’d like, so keep the intended purpose in mind as you form the shape.
Step 6: Let It Dry
Allow your air-drying clay to dry for 24-48 hours, depending on thickness. If using polymer clay, bake according to package instructions. For ceramic clay, bisque fire at the temperature recommended by the manufacturer. You will glaze and refire at a higher temperature listed on your clay/ glaze packaging. Need clarification about the ceramics process? See my blog about firing pottery HERE.
Step 7: Add Color (Optional)
For air dry clay or polymer clay, use alcohol inks or oil pastels to color the top of the clay or highlight the leaf’s veins. This step is optional but adds a personal touch to your decorative piece. For air dry clay, you can paint or add a sealant. Once it is dry, apply a matte sealer to protect your clay leaf bowls and enhance durability. If you are using ceramic clay, you can glaze your dishes using ceramic glaze of your choice. I recommend a glaze that is not too thick so that it will show the leaf veining. An opaque or overly thick glaze will cover up those beautiful details. Once your dishes have dried or been fired, your DIY clay leaf bowls are now ready to hold small items, serve as candle holders, or shine as soap dishes (if they are sealed)!
Creative Variations
• Mix Leaf Types: Combine different types of leaves for a set of clay dishes in different sizes.
• Experiment with Shapes: Create a small dish for rings or a larger shallow bowl for keys.
• Alternative Materials: Try salt dough for a budget-friendly/ kid-friendly option, though it’s less durable than air-dry clay.
Making your own imprinted leaf dishes is a great project for beginners and clay pros alike. Try this with your little ones and enjoy the whole process from foraging to forming your pots. I hope that you enjoy making this fun, earthy, and simple project. For more pottery/clay projects, check out my other tutorials HERE.
Blessings,
Samm