How to Make Easy DIY Clay Earrings For Beginners
This post contains affiliate links, which means I make a small commission at no extra cost to you. See my full disclosure here.
If you’re looking for a creative beginner project to make with clay, try your hand at crafting your own diy clay earrings! Whether you are looking for a way to use up some extra clay pieces or you just want to get into a new hobby, clay jewelry is a great option worthy of your crafting time. Great for thoughtful, handmade gifts or a simple way to build up your clay skills, creating polymer clay jewelry is a great beginner craft for all ages!
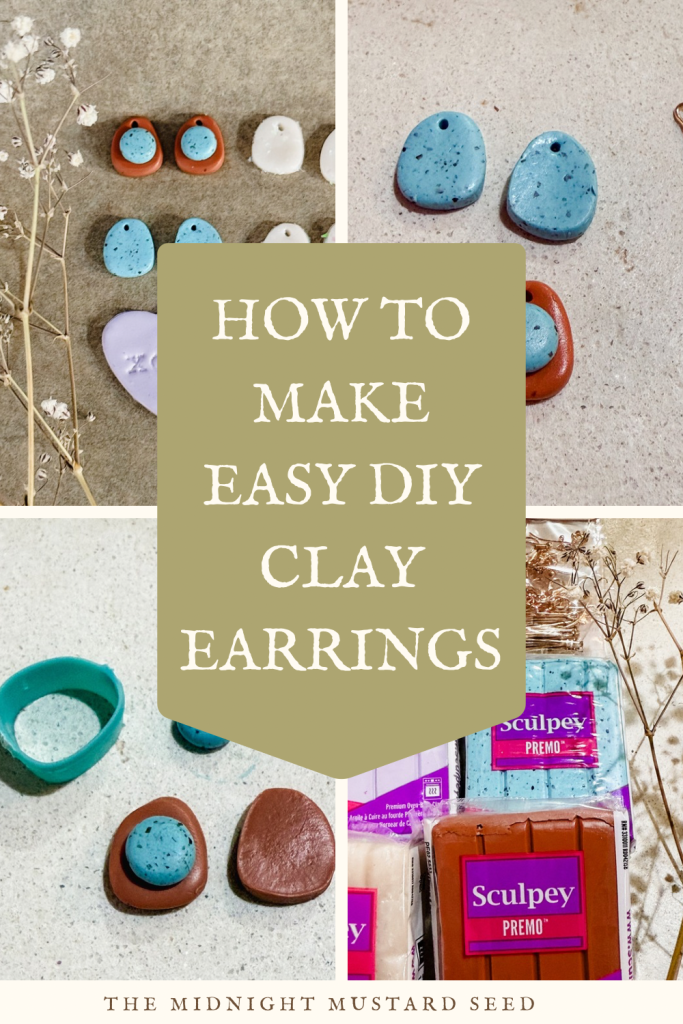
Sculpting with clay is one of my favorite art forms and there are endless possibilities with this medium. When I first began playing around with clay, I started with polymer clay. Many people love to use polymer clay because you don’t need any fancy equipment or expertise to get started. It is also a great option if you have a kid looking to get into clay. Eventually, I graduated to ceramics, but the skillset is pretty universal. Want to sculpt your own clay earrings? Follow along with this simple tutorial below. This tutorial can work as either a polymer clay project or a pottery project- the choice is up to you and the equipment available. Air dry clay will also work for this project, but I’d recommend using either polymer clay or pottery clay because they are far more durable. At the end of this tutorial, you should have your own pair of earrings, ready to wear!
Polymer Clay Earring Tutorial:
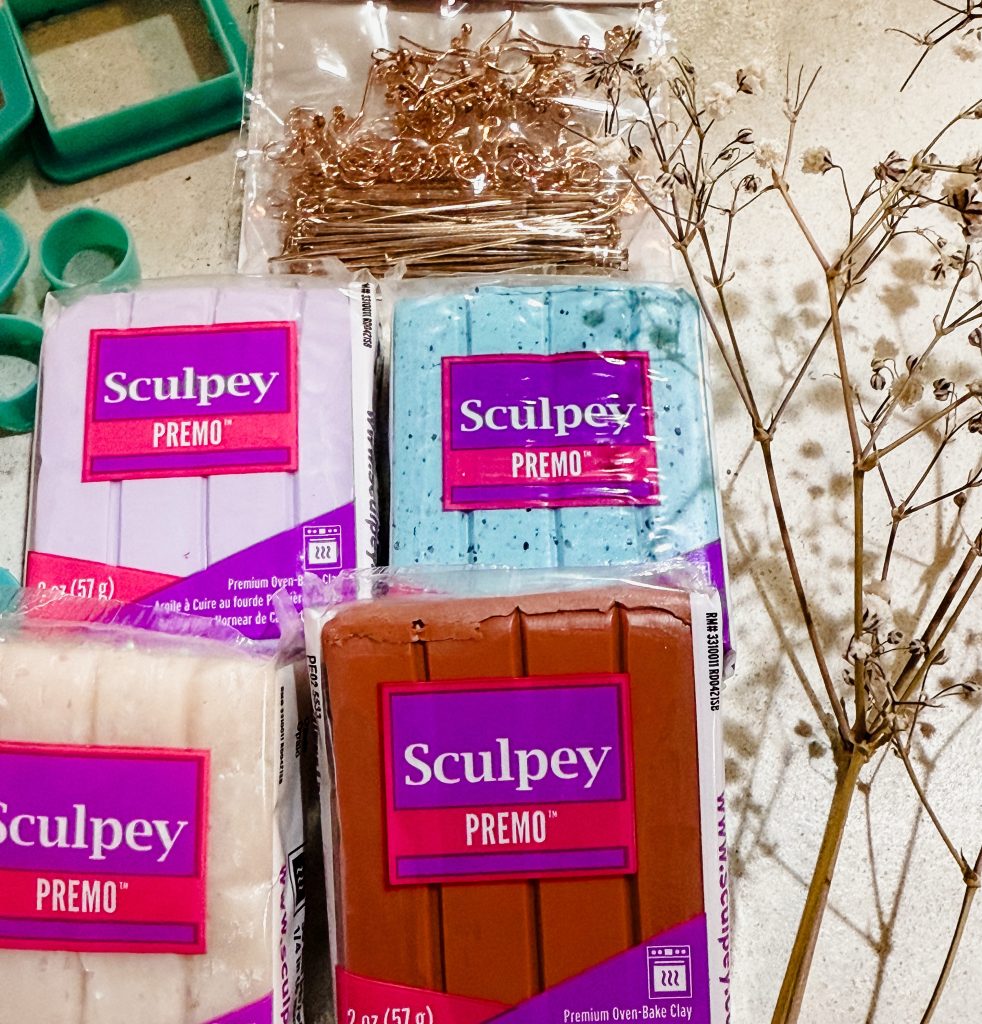
There are many different ways to create your own clay earrings. You can cut them from a clay slab using cookie cutters or you can sculpt three dimensional designs using small balls of clay. In this complete tutorial, we will cover both methods so that you can make any kind of earrings that you can imagine! I recommend using Sculpey Premo polymer clay- I really think this is the best brand of polymer clay out there. It’s what I’ve used ever since I was little. The best part is that it is considered nontoxic, so it’s perfect for crafting with little ones. Of course, always supervise children when they use clay of any form. In my photos, you will see me sculpting with polymer clay, but the steps are just the same.
MATERIALS FOR POLYMER CLAY:
–pasta machine (optional)
-rolling pin or clay roller
–Sculpey Premo (I recommend white clay for painting or grab a multipack for mixing your own custom colors)
–earring posts or earring hooks
-earring backs
-jump rings (for dangly earrings)
-acrylic paint (optional)
-home oven
-baking sheet
-varnish, resin, or sealant (optional)
MATERIALS FOR POTTERY CLAY:
-pottery clay
-clay cookie cutters
-kiln
-oil paints OR
-ceramic underglaze OR
-ceramic glaze
-xacto knife
-rolling pin OR clay roller
-earring posts or earring hooks
-jump rings for dangly earrings
-jewelry kiln stilts (if you plan on glazing both sides of your jewelry)
-jewelry glue
Slab Built Method:
The most popular way to craft clay earrings is through the slab method. The first thing you need to do is roll out your slab of clay. Choose your desired color and prepare the slab. You can either use colored clay if you have a certain design in mind or you can use all white clay and decorate with paint later on. Roll out your slab using a rolling pin or a pasta machine. Rolling your clay through a pasta machine is essentially like using a tiny slab roller. Although, you need to dedicate this machine to clay only as it is not safe for food use once it has been used for clay purposes. Be sure to roll out your clay slab in an even thickness so that your earrings are uniform when you cut them out. I like to do a slab that is around 1/4 inch thick.
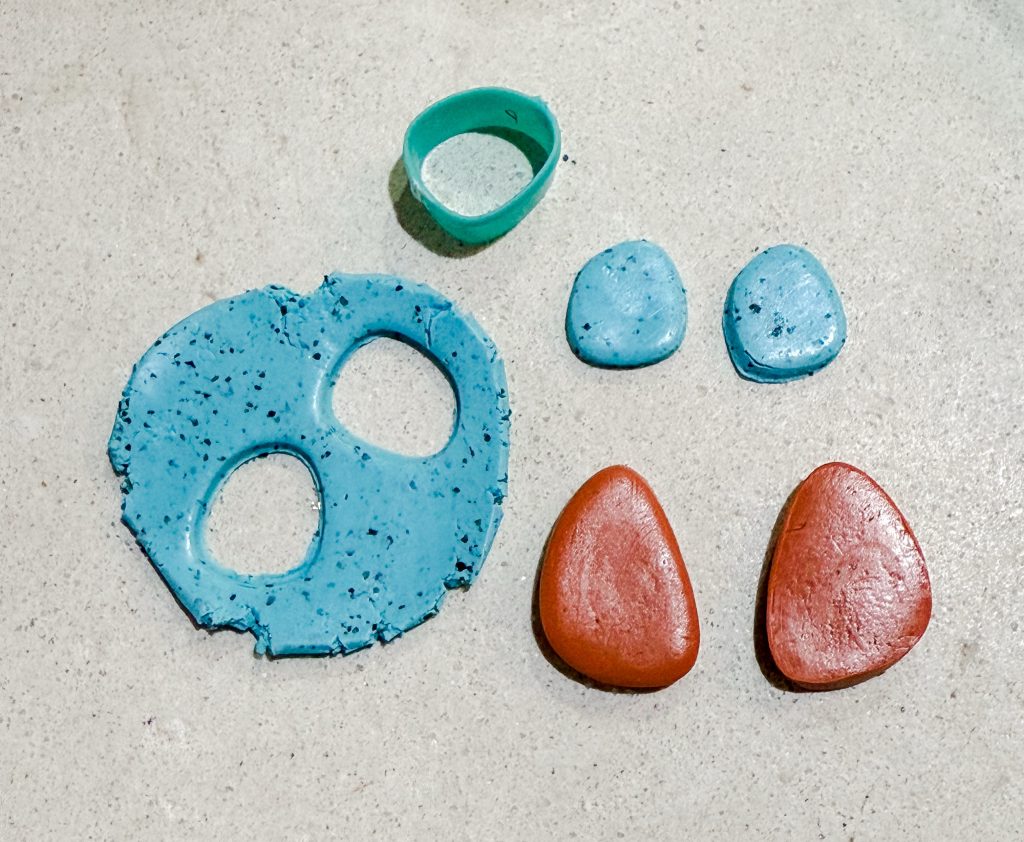
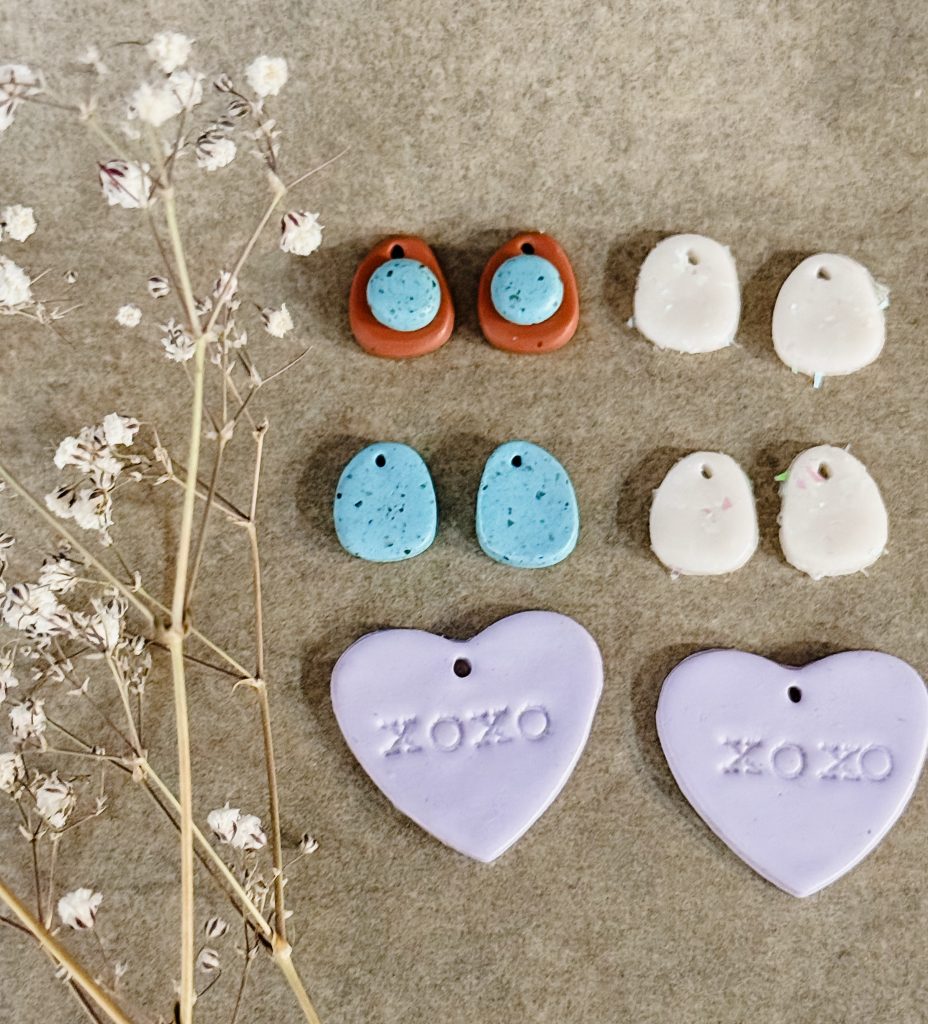
For the next step, choose what cookie cutters that you want to use. This will dictate the shape of your earrings. There are so many different shapes out there that would make beautiful earrings: teardrops, hexagonal shapes, floral shapes, or even use a heart shape. The possibilities really are endless. I will be using an irregular, organic shape to make some natural looking turquoise earrings. Use your selected cutter and cut out your shape. Use a finger to smooth out any rough edges. If you are making post earrings, then you are ready to move on to the next step. If you are making dangly earrings, you will need to make a small hole for the jump ring to go through. Your jump ring will be where your charm and earring hooks meet. Take your craft knife or even a small nail, and make a small hole at the top of your shape where you want it to hang from.
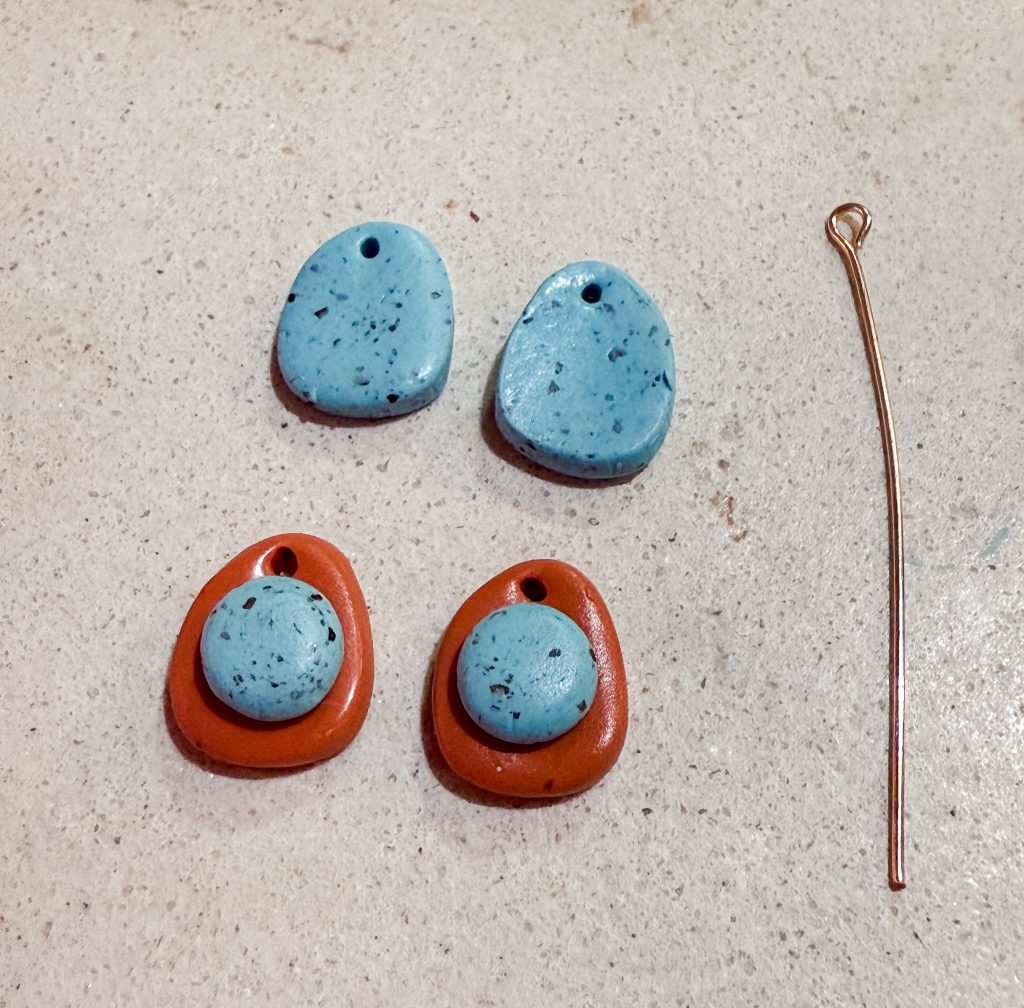
Now is the time to attach any additional clay embellishments. For example, if you’d like to add some raised florals or two shapes on top of each other, you will need to take a few small balls of clay and sculpt your flowers. Very gently attach the flowers to the base shape using light pressure. If they do not feel secured at this step, you can always bake them in place and reattach them using glue.
Once you are happy with the shape and sculptural decorations on your earrings, you are ready to bake. Place a sheet of parchment paper on your baking sheet and then place your earrings onto the prepared surface. Like with the pasta machine, you want to be sure to either cover your baking sheet in parchment paper or have a dedicated baking sheet for clay use only. Once bakeware is used to cook clay, it is no longer safe for food. Preheat your oven to 275 degrees or as specified on your polymer clay packaging. When your oven is up to temperature, you will need to bake your earrings for 30 minutes.
Next, we are going to decorate our earrings. If you chose to use colored clay, you may not want to paint them. If so, move on to the next step. If you used white clay or you want to add a few painterly details, grab those acrylic paints. Once you are happy with your earrings, you can either leave them as is or seal them for extra protection. You can seal your earrings with varnish, wax or resins which are available in any sheen that you’d like!
Finally, it is time to attach our earrings to our earring posts or hooks. For earring posts, dab a little dot of glue on the flat part of your earring post. Let it dry. For dangly earrings, very carefully thread your jump ring through the hole in your earring charm. Thread your jump ring through the hole on your earring hooks. Once the glue is set or your hooks are threaded, you are ready to wear your very own handmade clay earrings!
Sculptural earrings:
For sculptural earrings, the only steps that will change are the first two steps. Instead of rolling a slab and cutting out your earring shapes, you will take small balls of clay in the colors of your choice and sculpt your three dimensional forms. A great example would be these strawberry earrings (pictured below). Taking a small ball of red clay, form the basic shape of the strawberry. Then, take some green clay and sculpt the leaf shapes. Gently attach to the strawberry shape. Using a clay tool or small nail, make indentations for the seeds. Then you are ready to move on to the baking and decorating steps above.
Pottery Clay Earring Tutorial:
If you’d like to make earrings using pottery clay, the steps are very similar to what is above. You will also need access to a kiln. If you choose to make sculptural earrings, be sure to score and slip your attached pieces together to make strong bonds. If you’d like to read more about ceramic techniques like scoring and slipping, you can check out my basics tutorial on hand building HERE.
Let your earrings dry slowly, covered in plastic to prevent any warping or cracking. This usually takes about a week. Once your earrings are leather hard, you can decorate them using underglaze, applying the underglaze layers like you would paint. If underglaze is not your desired look, you can always place in your bisque fire and then glaze with ceramic glaze for the final firing. Another option is leaving your clay unglazed throughout the entire firing process and painting them with paints once they are out of the kiln. For my conversation hearts, I have fired my earrings raw the entire time and finished them with paints. Be sure to follow the cone temperature specifications according to what type of clay body you use.
There are so many possibilities when it comes to creating polymer clay or pottery clay jewelry. You can use the steps above to craft beautiful charms for bracelets or pendant necklaces. I hope that you enjoyed crafting your very own polymer clay earrings with me. You can find more clay tutorials and ideas HERE. Be sure to subscribe to the blog for the latest projects as well!