
How to Make A 3D Paper Tree For Your Classroom
Hey there, friends! I’m Samm, and if you’ve been hanging out here at The Midnight Mustard Seed, you know how much I adore diving into creative projects that bring a little extra warmth and wonder into our everyday spaces. As a mama and Christ follower who’s passionate about nurturing young hearts and hands, I truly believe that anyone can learn to craft something beautiful if they have the desire to do so.
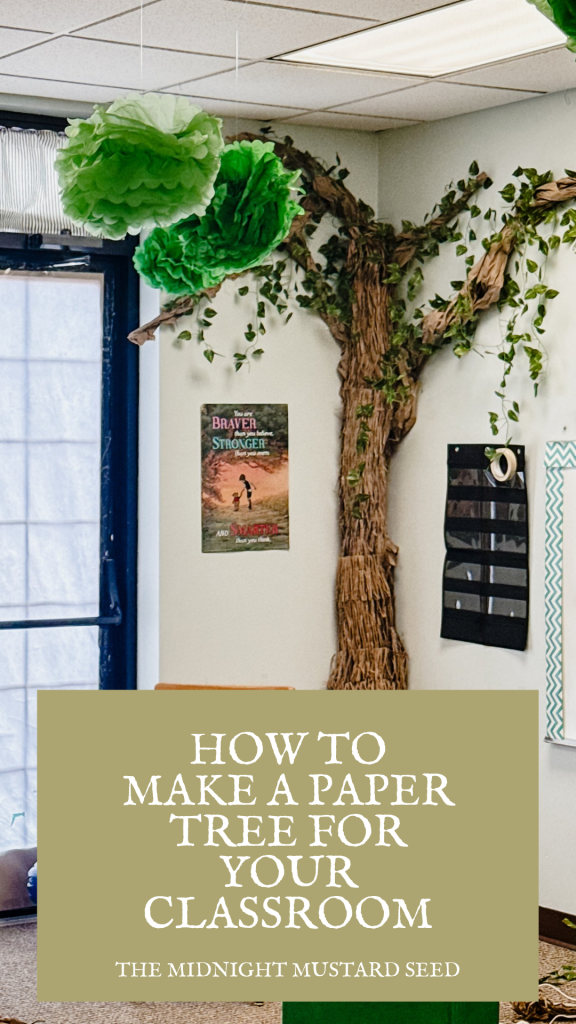
Today, I’m so excited to share a simple, heartfelt tutorial on making a 3D paper tree for your classroom. Whether you’re prepping for the holiday season with a festive 3D Christmas tree or dreaming up versatile paper trees like palm trees or even a family tree display, this project is perfect for sparking joy and creativity. These paper and cardboard trees make a wonderful party decoration as well. This year, I whipped one up for my preschool class, and it became the talk of the room. Want to add this whimsical, yet educational touch to your class? Follow this tutorial and make it yourself! Let’s get started and make good things together!
Why Make A Classroom Tree? The Joy of 3D Tree Displays
Picture this: a cozy corner in your classroom transformed with a stunning 3D paper tree that pops off the wall. Not only does it add that magical 3D effect to your space, but it’s also an incredible activity for young children to explore the changing of the seasons. We changed the leaves from green in summer, to reds and yellows in fall. I am planning to add snowflakes in the winter. This gives your little ones a tangible way to see the elements of the four seasons in their own classroom! From holiday season decorations like a paper Christmas tree topped with a star shape to everyday themes such as palm trees for a tropical unit or a family tree to teach about families, these 3D tree displays are endlessly adaptable. Plus, they’re budget-friendly and use simple materials you probably already have on hand. If you’re a teacher, homeschool parent, or just someone who loves infusing learning with fun, this is for you!
Materials You’ll Need for Your 3D Paper Tree
Before we jump in, let’s gather our supplies. Keeping it simple is key here. I want you to feel empowered, not overwhelmed! I often use materials that I have on hand or even recycle things that would otherwise be thrown away. For this tree, I put some old moving boxes and Amazon boxes to work!
• Green construction paper or cardstock (for the leaves)
• cardboard boxes or sheets(for the tree trunk)
• Brown butcher paper ( for making the branches)
• Clear packing tape
• Scissors (safety ones for young children)
• Hot glue gun and glue sticks
• Xacto knife
• OPTIONAL: faux leaves ( for a touch of realism)
• For Christmas Trees/Family Tree Adaptations: Yellow paper for a star shape at the top of the tree, glitter for sparkle, or photos for a family tree twist
That’s it! No fancy tools required, making this ideal for classroom settings or a relatively quick party decoration.
Step-by-Step Guide: Crafting Your 3D Tree
Alright, let’s roll up our sleeves and get creating.
Step 1: Prepare the Tree Trunk
Start with the foundation: your tree trunk. Determine how tall you want your tree to be. For my own classroom, I estimated the height of the ceiling but left a little space at the top to attach branches. Yours doesn’t have to be floor to ceiling. The size is up to you and your space. Open up your cardboard bs completely, opening the seam as well. Roll your cardboard box to create a cylinder trunk shape. You can secure with tape before you glue for an extra sturdy base. When it is the width you want, use your hot glue gun to glue it together. You can repeat this several times with multiple boxes depending on how tall you want your tree trunk. I love that the trunk is broken up into section. This modular design makes it easy to transport in your vehicle.
I wanted my trunk to be free standing, so I took another box and cut out two identical, 2D tree trunk shapes with slots to make its own supportive base. Put the slotted pieces together and hot glue in place. Make sure that the base is as tall or almost as tall as you want your tree to be. That way, all of your trunk cylinders will have support when you stack them. Creating a base is optional, and you can skip this step if you can secure your train to the wall. However, it’s a lot less stress to make it self-supportive. Slide your bottom cylinder onto the trunk base. You can now stack the rest of your trunk cylinders.
Step 2: Cut Out the Bark Pieces and Leaves
Now for the fun part—creating the layers of texture for that 3D effect! You can use shredded boxes for a fun palm tree effect, or tear pieces of cardboard or brown construction paper for an earthy, bark effect. If you want to add leaves, cut any leaf shape from the construction paper or card stock color of your choice. The leaves and bark work together to give this craft so much dimension. For a paper Christmas tree, make pointy leaves like evergreens. For palm trees, go with rounded, frond-like shapes. You can even involve your students by having them craft leaves-it builds excitement and teaches littles about the different parts of a tree.
Step 3: Add a 3D Effect or Artistic Flair
Here’s where the magic happens! Fold each leaf piece in half vertically to create a crease, then unfold and gently fold the edges inward to make them stand out. This simple technique gives your paper trees that dimensional pop. For a Christmas flair, have young children decorate ornaments with markers and glue them on. Crown the top of the tree with a star shape cut from yellow paper—add some glitter if you’re feeling festive for the holiday season. If it’s a family tree, attach small photos or names to the branches.
Step 5: Customize Your Tree Display
Tailor it to your theme! For a 3D Christmas tree, string on paper chains or lights. Palm trees? Add sandy bases with yellow paper. A family tree? Hang it in the classroom to showcase student stories. Around Thanksgiving or Christmas, use it as a gratitude tree, with leaves describing what your students are thankful for. There are so many opportunities to incorporate your tree into your lessons.
Working with young children? Supervise their cutting to keep it safe, and let them focus on gluing and decorating to hone those fine motor skills. This project is wonderful for sensory play too— the crinkle of paper and stickiness of glue engage all the senses. If your classroom tree starts looking a bit wonky, embrace it! Imperfection adds character, just like in life.
There you have it—a simple, yet impactful way to bring a 3D paper tree to life in your classroom. Whether it’s sparking holiday season magic with a Christmas tree, exploring different trees for different climates, or teaching about the seasons with changing leaves, this craft can spark such joy in your class. As a mama and teacher who cherishes these moments, I encourage you to dive in, have fun, and watch those young faces light up. Anyone can do this with a little elbow grease. No matter what your tree turns out like, God will bless your efforts to nurture these little souls.
Thanks for stopping by The Midnight Mustard Seed. If this inspired you, sign up for my newsletter for more craft ideas, homemaking tips, and encouragement on motherhood. I’d love to see your own special twist on this project. Let’s keep making good things. 💕
Blessings,
Samm


