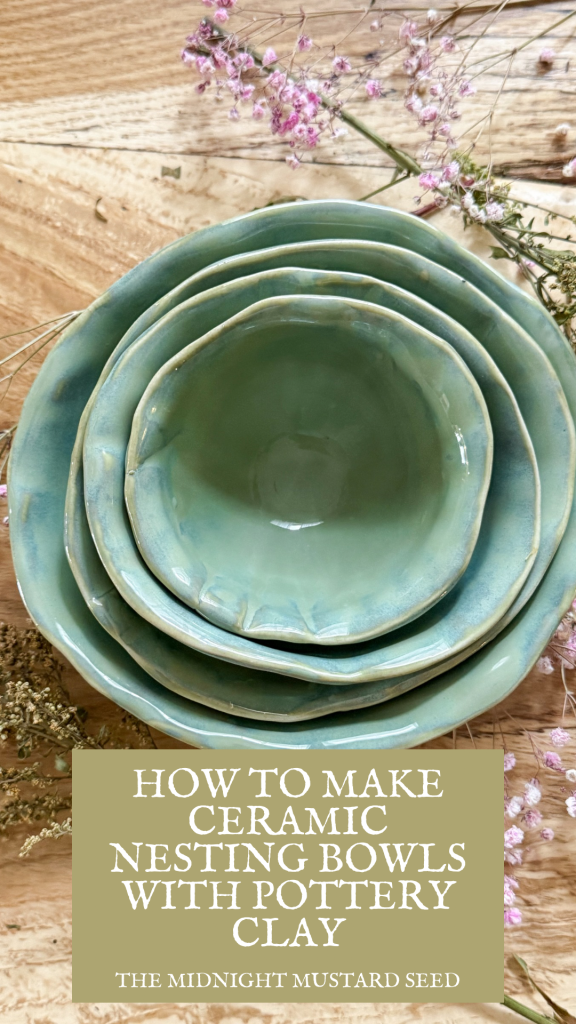
How to Make Ceramic Nesting Bowls with Pottery Clay
How to Make Ceramic Nesting Bowls with Pottery Clay: A Step-by-Step Guide
My husband and I celebrated our 10 year anniversary recently, and ironically, on the same week, a bowl from our wedding pottery was accidentally broken. We have lost pieces here and there over the last decade. It was definitely time for a replacement set. I realized I’ve never made pottery for us to use in our own home, so I decided to make a full set of dishes, starting with bowls of all sizes. We are limited on cabinet space, so I waned to make nesting bowls that will fit neatly within each other. If you love nesting bowls as much as I do, this is a great hand-built pottery project to try! Whether you’re a seasoned potter or a beginner eager to dive into the world of slab pottery, making ceramic nesting bowls with pottery clay is a rewarding project that blends creativity with function.
In this guide, I’ll walk you through the process of crafting your own set of nesting bowls, optimized for both beauty and practicality. Let’s get our hands dirty and create something good!
Why Ceramic Nesting Bowls?
Ceramic nesting bowls are the perfect blend of form and function. They’re ideal for small kitchens, saving space by stacking neatly inside one another, and they add a touch of handmade charm to your home. From the largest bowl for serving your favorite soups to the smallest for serving dips or toddler sized portions, these bowls are versatile and timeless. Plus, making them yourselves out of clay allows you to customize shapes, sizes, and glazes to fit perfectly in your home. I will be creating nesting bowls with an irregular, organic shape to match the earthiness of our house.
What You’ll Need
Before you start, you will need to grab a few your supplies. Most of these can be found at your local pottery shop, or even a kitchen supply store. Most things are likely already in your studio if you’re a seasoned potter.
• Pottery clay: Choose a smooth, medium-grog clay for slab pottery. The amount of clay depends on the size and number of bowls—start with about 2-3 pounds for a set of three nesting bowls. Pay careful attention to the cone of your clay so that you know what glaze/ temperature to fire with.
• Tart tins or Bowl Molds: These will act as your bowl forms. Pick a variety of sizes for nesting, ensuring the largest bowl is no bigger than your kiln’s capacity. Tart tins work well for shallow bowls with scalloped edges. I will be using a set of wooden bowl molds.
• Basic pottery tools: Rolling pin, slab roller (optional), cutting tool, and a sponge.
• Kiln and glazes: For firing and finishing your handmade ceramics. I will be using medium range cone 6 clay and glazes for my bowls.
• Workspace: A clean, flat surface for rolling out slabs.
Step 1: Plan Your Nesting Bowls
Start by deciding how many bowls you want in your set and their sizes. A typical set includes three to five bowls, with the largest bowl around 8-10 inches in diameter and the smallest around 4-5 inches. Sketch your designs, keeping in mind that each bowl must fit snugly inside the next. They will shrink a little bit in the drying and firing process as well.
Step 2: Prepare Your Pottery Clay
The amount of clay you’ll need depends on the size of your bowls. For a medium-sized set, allocate about 0.5-1 pound of clay per bowl. Smaller bowls will use around half a pound while bigger bowls will respectively require more. Knead the clay to remove air bubbles, ensuring it’s smooth and pliable. If you’re new to slab pottery, a slab roller can help you achieve an even thickness (about ¼ inch is ideal for bowls). If you don’t have a slab roller, use a rolling pin roll out a uniformly thick slab of clay. You can lay down a piece of parchment paper or canvas cloth to prevent your clay from sticking to your work surface if your clay is overly wet.
Step 3: Create Your Slabs
Once your clay is rolled into a uniform slab, it is time to cut out your bowl templates. Cut out circles slightly larger than your tart tins, as the clay will shrink during firing (typically 10-15%). Use your bowls or tins as a template and trace around them to get precise circles. Slab pottery is forgiving, so don’t worry if your edges aren’t perfect—you can smooth them later.
Step 4: Shape the Bowls
Gently drape each clay circle over the upside-down bowl molds, pressing the clay to conform to the mold’s shape. Smooth the surface with a sponge to remove any creases or air pockets. If you prefer a more organic look, you can slightly manipulate the edges for a wavy or irregular rim. For nesting, ensure the inner diameter of each bowl is slightly larger than the outer diameter of the next smaller bowl. Let the clay firm up slightly (to a leather-hard stage) before removing it from the mold. Cover with plastic while it dries to prevent cracking. If you want to know more about the stages of clay and the firing process, you can read about that HERE.
Step 5: Assemble and Refine
Once the bowls are leather-hard, carefully remove them from the molds. Smooth any rough edges with a sponge or your fingers. If you want to add handles, feet, or decorative elements, now’s the time. Score and slip any attachments to ensure they bond securely. Stack your bowls to double-check the nesting fit, making adjustments as needed. This step is where your handmade ceramics start to take on personality—don’t be afraid to get creative!
Step 6: Dry and Bisque Fire
Allow your bowls to dry slowly under plastic wrap or bags to prevent cracking. Once bone-dry, bisque fire them in your kiln to about Cone 04 (for cone 6 clay). The temperatures will vary depending on what type of clay you use so be sure to check the manufacturer’s labeling. Bisque firing hardens the clay, preparing it for glazing. If you’re new to firing, consult your kiln’s manual or a local pottery studio for guidance. You can also check my blog listed above.
Step 7: Glaze and Final Fire
Choose food-safe glazes for your ceramic nesting bowls, especially if you plan to use them in the kitchen. Apply glaze evenly, ensuring no areas are too thick, which could cause running. Fire the bowls to the glaze’s recommended temperature (usually Cone 5-6, around 2160-2230°F). Once cooled, your handmade ceramics are finished!
Step 8: Show Off Your Creation
Your ceramic nesting bowls are now ready to stack, store, and use! Display your bowls in your kitchen or gift them to a loved one for a sweet, yet useful handmade gift.
Tips for Success
• Test your clay: Different clays shrink at different rates, so make a test tile to gauge shrinkage before committing to your final bowls.
• Experiment with textures: Use stamps, lace, or natural objects to add unique patterns to your slabs before shaping.
• Shop smart: Kitchen stores often have affordable tart tins, and you can find pottery clay at local art supply shops or online.
Making ceramic nesting bowls is a delightful way to explore slab pottery and create functional art. With a few tart tins or molds, the right amount of clay, and some inspiration, you can craft a special set of your own handmade ceramics. Whether you’re a beginner or a pro, this project is an invitation to slow down, get creative, and embrace the tactile joy of pottery. So grab those supplies, and start shaping your own nesting bowls today! For more pottery tutorials and other handmade home goods, check out more on my blog, The Midnight Mustard Seed.
Blessings!
-Samm