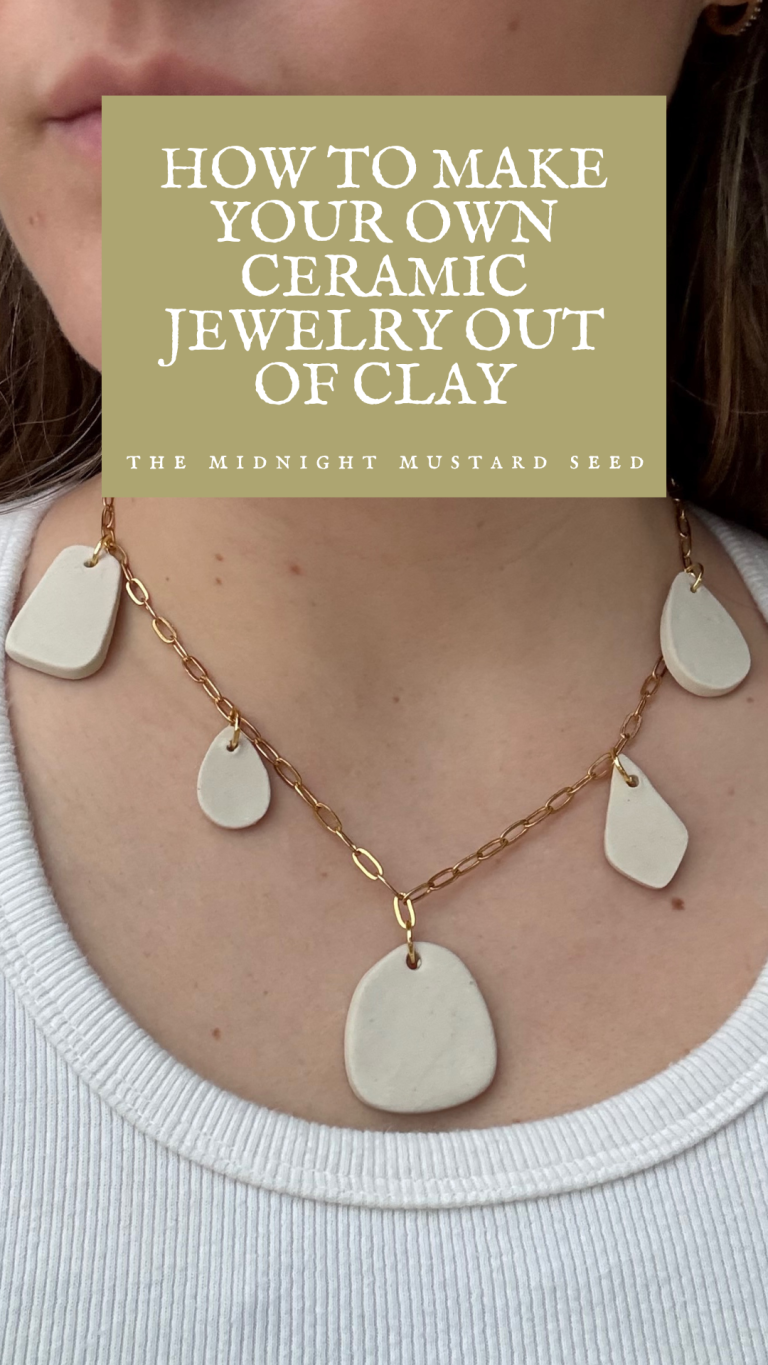
How to Make Easy Melt and Pour Blood Orange Soap

Making Summery Soaps
It’s one of my favorite times of the year, when spring begins to warm and transition into early summer. Here in the south, the warmth comes quick, so you really have to enjoy this sweet spot while you can. In the early warmth, flavors become brighter in the foods we cook and fragrances brighten as well! I noticed we were running low on bar soap the other day, so I knew it was time to whip up a fresh batch of homemade soap. If you are familiar with the blog, then you know soap making and candle making are things I like to do from time to time. It may seem intimidating to get started making your own soap or candles, but really all you need is a little bit of know how!
We have made homemade cold processed soap on the blog before. You can find that project HERE. Cold process soap is a little bit more intensive than hot process soap making. Hot process soap making, or melt and pour, is a great introductory project if you are interested in making your own soaps and personal products to use in your home. Since southern summer is upon us, I thought I would make a new hot process soap recipe. Citrus scents are some of my favorite to use in my soap or candle making. They smell clean, a little tangy, and cheerful- perfect for those warm summer months! This easy soap recipe is the perfect creative home project to try as the weather warms up!
Hot Process VS Cold Process Soap Making
The two main methods for creating your own soap are hot process soap making and cold process soap making. Both have their own benefits and disadvantages. To make this orange soap recipe, I will be using the hot process method. Hot process soap making uses a melt and pour method that is very beginner friendly. You simply choose your soap base, which can be made from olive oil, shea butter, or goat’s milk. The base is microwaveable so you would melt down your base in the microwave and then add scents, colorants, and any other additives. There is no intense chemical reaction like you would find in cold process soap making, making it a relatively safe activity that most anyone can do. It also takes much less time to cure so you can get that instant gratification from your soap project that you won’t get with cold process soap making.
Although hot process soap making is very easy, it does have its drawbacks. The extra heat from the microwave or heating process can cause certain scents to fade some. I like to use the double boiler to heat my soap base to just the right temperature. It is also difficult to add certain fats or additives like milk to your soap, so if superfats are super important to you, I’d opt for cold process. You are also limited to the melt and pour soap bases that are on the market so hot process soaps aren’t as customizable. There is a familiar look, feel, and smell to hot process soaps that have been made with commercial bases. If you want a bar that is very unique, with endless design possibilities, I would say that cold process is the way to go. However, hot process soaps can be just as beautiful and enjoyable. I thought I would give melt and pour soap a go since I am in a pinch and just about out of soap bars around here!
Materials:
-Melt and pour soap base ( I will be using a shea butter base here)
-soap mold ( I will be using a small loaf mold but any silicon molds will work
-orange essential oils, essential oil blend, or nontoxic fragrance oils
-measuring cup for melting the base or a double boiler
-soap cutter
-food scale for calculating fragrance ratio
-natural colorants like mica powder
-Orange zest or lemon peel
-food thermometer
Choosing a Soap Base
One of the major selling points that convinced me to make my own soaps the fact that I could get rid of harmful ingredients. Making your own soaps makes it easier to opt for natural ingredients and avoid sulfates, dyes, and other potential toxins that your loved ones use on their bodies. As a toddler mom, I am all about minimize harm wherever possible- even soap!
Not only do handmade soaps have natural, better ingredients- you can also choose and customize your soaps based on your family’s skincare needs. Every soap base has its own special benefits that can help you make a Goldilocks soap that is *just right*. The most common melt and pour soap bases on the market are goat’s milk soap, shea butter soap, aloe soap base, oatmeal soap, and olive oil soap base. You can also choose your soap base according to its color. Soap bases often come in a clear soap base or white base option. This will largely depend on the type of fats used in the soap base.
Shea butter soaps are wonderful for dry skin because of how moisturizing the butter is. Aloe soaps are very cleansing and great for skin that tends to have a little irritation or redness. Oatmeal soaps are gentle and soothing. Olive oil soaps are all of the above! Some people even make charcoal soaps or clay soaps for cleansing facial pores. Choose your skin needs and you can tailor your handmade soaps to meet them!
Choosing Fragrance Oils
When it boils down to it, choosing essential oils is always the healthiest choice for soap or candle fragrances. Pure essential oils are fragrances that have been derived and distilled from natural plants. Essential oils are the best fragrance choice when it comes to scenting body products or personal care products. I’m very much of the mindset (within reason) that if it isn’t natural, it doesn’t belong on our bodies. Using essential oils is a great way to add scent the healthiest way possible.
When it comes to choosing safe fragrance oils, we want to look at a few different things. Make sure the manufacturers have safety data sheets for all of their fragrances. Most every company that sells premium fragrance oils have a data sheet for every scent. On these data sheets, you will be able to see any potential toxins, hormone disrupters, or parabens listed. A few wonderful nontoxic fragrance oil brands are CandleScience Brambleberry.
You may be wondering if candle fragrance oils and soap fragrance oils are interchangeable and usable for either project. That is a great question and the correct answer would be that it depends. Some premium fragrance oils can be used for both soap making and candle making, while others may only work for one or the other. To figure out how to properly use your fragrance oils, consult those handy safety data sheets again. Usually product listings on a supplier’s website will tell you their intended purpose, but you can also find them on the data sheets. You will also be able to see how much fragrance you should use in your projects, otherwise known as the fragrance load. Even if oils are nontoxic, too much fragrance oil or an unbalanced recipe is never a good thing.
Melting the Base
Now that we’ve discussed a little bit about choosing our own soap bases and fragrances, let’s get to making our own melt and pour orange soaps! The first thing we are going to do is prep our soap base. Take your personal preference of soap base and cut it into small cubes or chunks. I will be using an easy melt shea butter base for its moisturizing properties. Cutting your soap base will melt much faster and easier than if you stick an entire hunk of soap base in your double boiler. If you have a double broiler that you’ve used before, for either soaps or candles, be sure to clean it out with a little isopropyl alcohol (or rubbing alcohol) so that your fragrances don’t run together.
Melt your soap base in your double boiler until all soap chunks have dissolved. Stir slowly to get all remaining bits of unmelted soap. Be sure not to stir too much because this will introduce air bubbles into your soap. Remove your fully melted base off of the heat source.
Adding Fragrance
For the next step, we will be adding scent to our handmade soaps. Before we just dump a whole bunch of fragrance or essential oil into our soaps, we must first calculate the fragrance oil load for the amount of soap we are making. The percentage is usually found on your fragrance or essential oil packaging, or you can find the manufacturer’s safety data sheets online. For the fragrance oil I will be using, the maximum fragrance load is 6%. If I am melting 32 ounces of soap base, I will need to calculate 6% of 32 ounces which would be around 1.9 ounces. This will vary for each individual fragrance or essential oil, even among the same brand, so be sure to check your packaging.
Take your food thermometer and check the temperature of your base. When your base cools to 145 degrees Fahrenheit, it is time to add fragrance! It is very important not to do this at an overly high temperature as you could lose some of your fragrance strength. Grab your wooden spoon and stir in the fragrance for around 2 minutes. Be careful not to mix too fast or furiously as this will introduce more air bubbles that will end up in your soap bar!
Adding Colorants
Now it is time to add in the final touches before we pour! Adding colorant or additives is a great way to add some personal pizazz to your melt and pour soap. While your handmade soaps may not have gone through the intensive process that is cold processed soap making, you can still achieve similar, beautiful soap designs with this method. For my orange soap, I am using a slight ombré or gradient look. I will start with a white soap layer for my first layer, adding a slightly darker orange second layer, adding colorant to the next layer. I will add more colorant as I pour to darken my base between layers. Let each layer dry a little before you pour your next layer. You can make your soap whatever colors you like. Add a paint splatter effect with soap base colored a second color on top of the soap or do a swirl pattern in your soap. It is up to you and your creative vision!
Pour Soap Base
Finally the time has come to pour our melted soap base. Be sure that you are using a silicone mold for your bar soaps so that your soap will release once it has hardened. I will be using a small loaf mold for mind, and slicing them into separate bars. However, you can find silicone soap molds in all shapes and sizes that you can pour your base into. Unlike cold process soaps, melt and pour soap does not require much curing time at all! Cold process soaps typically require 2 weeks of cure time. This melt and pour soap recipe will be ready to use as soon as it as fully hardened-usually in a couple of hours! Pop it out of the mold, slice it into soap bars and enjoy! My soap recipe made about 10 bars of soap.
I hope that you have had a blast making your own melt and pour orange soap! It is such a refreshing soap to enjoy in these warm summer months coming up! Use it for your own personal use or give it as a sweet summer gift. For more diy soap tutorials, candle making, art projects and more, be sure to follow along here at The Midnight Mustard Seed!
Blessings!
Samm