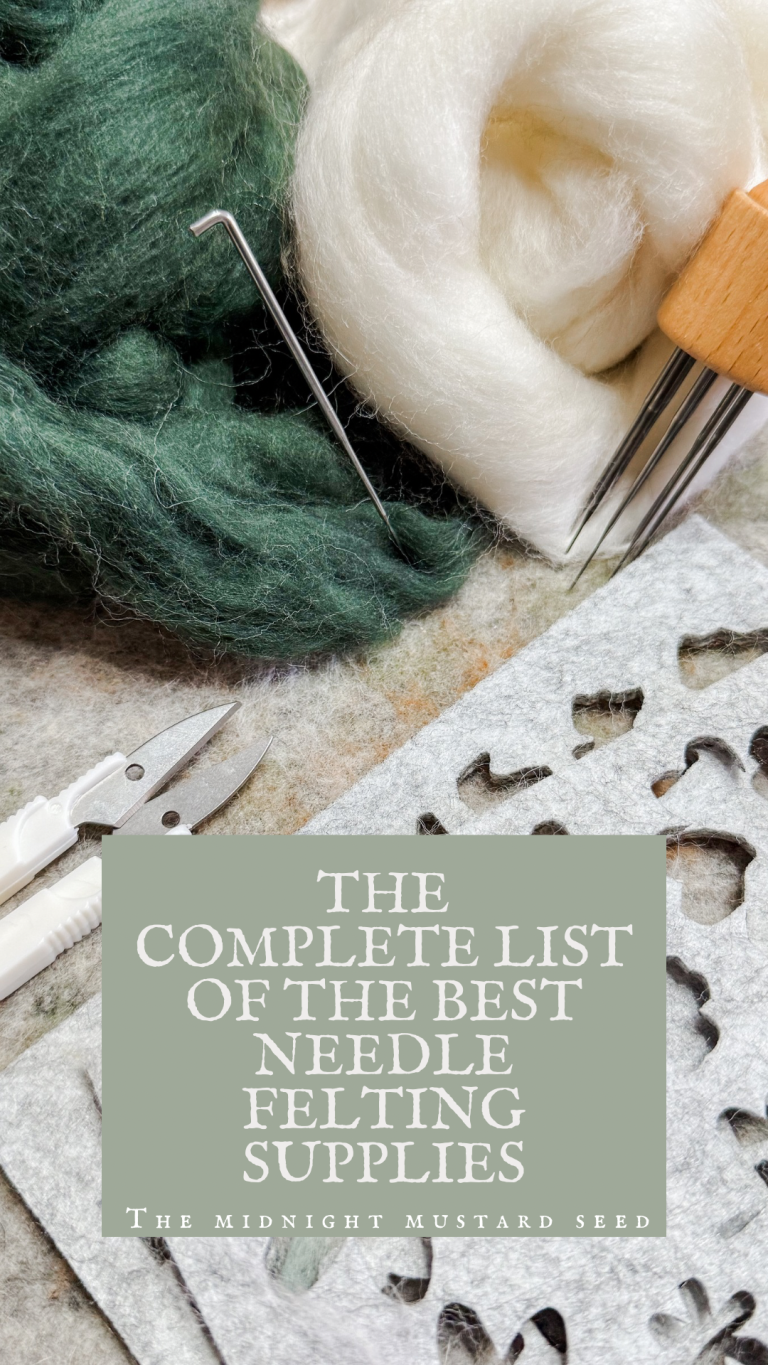
Pottery Studio Supplies: Setting Up Your Home Studio
This post contains affiliate links, which means I make a small commission at no extra cost to you. See my full disclosure here.
Lately, I’ve been dreaming up what my new studio will be like- where will my pottery wheel or kiln go? Where should I set up a work table? That inspired me to create a list of pottery tools and supplies for you guys that will make any studio feel highly productive and functional- even if you don’t have a lot of space.
My husband and I tore down my small garage pottery studio recently. This sounds sort of sad, but I’m actually very excited to start fresh with a new space! A separate area for my ceramics has been needed for quite a while now, especially after adding a little one to the family. We need the storage space for all of the various baby items, our car, and one day a little bicycle. Before I needed a separate space, my little 10×10 garage studio was perfect! You do t have to be a serious potter to set up a great place at home to create. It is so beneficial to have a dedicated space for potting .The key is to know what supplies and equipment are really necessary and helpful as well as how to set things up.
Deciding What Tools You Need
The major things to consider here are what processes you use to create your ceramics and how to do so safely. If you are a potter that primarily hand builds, then you probably don’t need several potter’s wheels. Focusing on necessity will help you set up a clutter free studio and maximize your work space.
Pottery Wheels
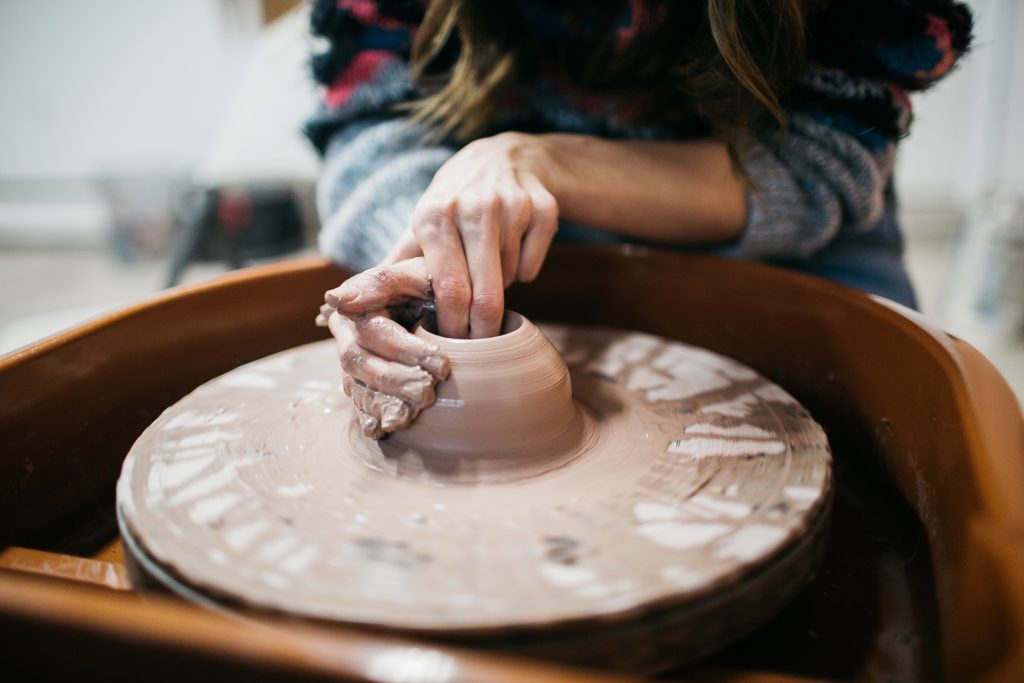
If you plan on wheel throwing, you will need a potters wheel. There are a few kinds of potters wheels to choose from: kick wheels or electric potter’s wheels. I have an electric wheel that is actually handmade. If you don’t have a budget to purchase a new one, find someone handy with electricity in your family and rig one up yourself! You can purchase all of the pottery wheel components from most ceramic shops.Try arranging your potter’s wheel in a corner of the studio if you have a small space.
Damp Rooms + Shelving
In my production potter days, I loved to have lots of shelving along the walls to place my work on as it was being thrown and processed. A little tip to help keep your clay damp as you process pieces is to create a damp box out of your shelves. All you’ll need is some heavy duty plastic sheeting and Velcro I used this hack for many years and it’s worked great! Other potters love to get a small greenhouse shelf and just zip it closed to keep their work damp. Plastic bags will work in a pinch as well.
Work Surfaces + Wedging Tables
It is always a great idea and super handy to have some sort of work surface or wedging table in your studio. I recommend this being a counter that is affixed to a cabinet or the wall. Otherwise, most studio furniture needs to be a heavy duty piece that won’t move as you work on it. I had a card table set up in my garage studio for a while and it was no good! You don’t want your work table to move around while you’re trying to wedge heavy balls of clay! It is also best if the work surface is sealed or easy to clean clay off off. We want to keep our studio dust free and wiped down, but we will discuss more on that later.
Whether you hand built or wheel throw, you will need a few basic tools to create good pots. I’ve written an entire blog post about my favorite tools to have on hand HERE. I like to store these tools in a bucket on my work table so they are ready to grab whenever I need them.
Slab Rollers + Clay Extruders
If you work with slabs often, then a slab roller would be a very excellent tool to have in your studio. They help roll out large slabs with even thickness much easier and faster than you could roll one out by hand. There are very large slab rollers or table top rollers. Many polymer clay artists utilize a small version of this tool.
Larger slab rollers are an investment, however. Don’t worry if that isn’t in your budget. You can always source one secondhand or use an old fashioned rolling pin and build up those arm muscles!
Another helpful tool to have is a heavy duty clay extruder. Extruders have been used for many things like polymer clay and even cake decorating. The concept of how to use them is the same in ceramics. You are essentially pushing clay through a tube to get a long strand of clay out in a particular shape. With ceramics, you just need a heavier duty extruder! I have THIS heavy duty extruder gun from the Ceramic Shop and I love it! It can be used to make handles, coils, and so much more. While it isn’t a necessity, it is very nice to have on hand.
Setting up A Kiln Room

If you plan to fire your own work, then you will need a kiln. I love Skutt kilns. I think this is the best brand, and the KM818 model is a great size for beginner and professional potters alike. It is also of the utmost importance that you set up your kiln safely and in a separate area that has plenty of ventilation. Kilns require a clearance of 18 inches minimum on all sides to avoid potentially causing damage. These ovens get incredibly hot (most are somewhere around 2300 degrees Fahrenheit) so we don’t want to melt or potentially catch something on fire from the heat they give off.
You’ll need to purchase a ventilation system or find another way to let the off gasses out. When I had a garage studio, I’d leave our automatic garage door open so they just go straight outside. True ventilation systems are the best and safest way to go though. We are looking into setting one up in the new studio.
Kiln Furniture + Spare Kiln Parts
To use your kiln, you will also need some kiln furniture. Kiln furniture consists of kiln shelves, kiln posts, and kiln stilts. You shouldn’t fire your pots directly on the bottom of the kiln. To prolong the life of your kiln, you will need to use kiln posts and shelves. Using this kiln furniture is a game of balance. Arrange your posts in a way that it will support the kiln shelf on all sides. Then, you can stack your pottery on that shelf and fire.
Before firing, however, you will need to treat your kiln shelves with kiln wash. Kiln wash acts like a barrier so that any glaze drips don’t fuse directly to your shelf and damage them or your work. Kiln stilts are used to fire pots that have glazed bottoms so that they don’t adhere to the kiln shelves.
As far as kiln maintenance goes, I would also recommend purchasing a few extra thermocouples, relays, and elements for your kiln. Consult your kiln manual for exact specifications on which types your kiln requires. These parts are the life force behind your kiln. If these components get burnt out, and they will, then your kiln is not functional. Thermocouples read temperature inside your kiln so that the control board knows how long to fire and when to shut off. If there is no way to read temperature, then your electric kiln will not get accurate information and can fire your wares incorrectly. Elements heat up your kiln and without them, no firings can occur.
A Water supply + Plumbing/Sink Traps
The final thing that you’ll need in your pottery studio is a water source of some kind. If you can have a plumber (or handy husband) run a water line to your studio, that is the best scenario. If you plan to rinse your clay tools in a sink where the sediment will travel down your plumbing, you will also need a sink trap. DO NOT rinse clay down your drain without one or the clay sediments could clog the pipes in your home or studio space.
Don’t be discouraged if running water in your space or altering plumbing isn’t an option for you. You will simply need a faucet or hose to get clean water from and a place to discard your dirty water when you’re finished. For the longest time, I used cheap $2 water buckets that I grabbed from the hardware store. I’d fill two buckets with clean water. One bucket was used for working with clay whether that was on the wheel or hand building. The other bucket was my cleaning bucket where I’d rinse tools or wash my hands.
Ceramic Supplies
You are also going to need a stash of ceramic supplies to make your pottery. Try having several lbs of clay on hand. I get my favorite clays from the ceramic shop or Kentucky Mudworks. You can also check your local ceramic supply. Most of the time, local shops can give you great discounts on clay and glazes. Not to mention, you save a bundle on shipping.
If you plan to mix your own glazes, you may want to store the raw materials for glaze creation as well. I have one of those rolling carts loaded up with my glazing supplies like paint brushes, glazes, underglazes and carving tools for sgraffito. You can find these at Amazon or ikea for fairly cheap. If you don’t have a lot of time to devote to glaze chemistry, there are beautiful commercial glazes available at your local ceramic supply store!
My final tip for setting up your own studio is to get creative with it! Almost anything can be used as a pottery tool to cut or make textures. Maybe you have a favorite stamp that you use to make a pretty design in the clay. Is there a cool vintage doily with a pattern on it that you love to roll into the clay? These are all valuable tools if they help you find your creative voice as a potter. Don’t be afraid to play around with different objects! Find whatever works for you.
Work to create a pottery space that you will enjoy spending time in while you hone your skills. The best thing you can do is take the pressure off of yourself to have that picture perfect studio. Paint it a color you like or fill it with plants. It is about what works for you and what inspires you.Tool collections take years to form and as you build your skill set, you will build your knowledge of what belongs in your clay studio! My previous studio was far from perfect and it’ll take me years to perfect the next one. There is fun to be found in the process. Happy potting and blessings to you!
Samm