Guide to the Best Tools for Pottery and Ceramics
This post contains affiliate links, which means I make a small commission at no extra cost to you. See my full disclosure here.
Have you been interested in picking up pottery as a new hobby? The world of ceramics is so vast and it can be hard to figure out what you need to get started. Sculpting with clay seems simple enough. Do you really even need anything besides the clay itself to make amazing clay creations?
While it is totally possible to create ceramics entirely by hand, a collection of great tools can really help you on your pottery journey, even if you are hand building! Here is a list of pottery tools that have helped me both as a hobby potter and in my pottery career. If you aren’t entirely new to ceramics, don’t worry. There are a few more comprehensive tool comparisons for you on this list as well!
Basic Tools:
When you are getting started in ceramics there are a few essential tools that will set you up for success! This includes not only tools themselves but some basic studio items and equipment as well. Let’s dive in!
1. Pottery Apron
You are going to want to keep one or two aprons around your studio. Clay is a messy craft. It gets on, we’ll, everything. Your clothes, your shoes, you name it and clay or clay dust will find its way on it.
Aprons are always a good idea and can often save your clothes in a pinch. Be especially sure to donn an apron if you are working with heavily pigmented clays like terracotta. That ruddy red color doesn’t always come out in the wash. You will want to rinse your aprons to rid them of any clay debris before throwing them in the wash as well. Pottery in plumbing pipes is a big no no!
2. Buckets and Excess Water
If you are completely new to pottery, it is crucial to know that the most important tool you’re going to need is water. It is equally pressing to know that your water needs to be separate from any running water in your house. What I mean by this is that it isn’t safe for you to wash your hands, tools, etc in your kitchen sink or bathroom sink. Clay sediment is known for building up in pipes and causing blockages and other plumbing issues. It is best practice for all potters to use buckets of water when working with clay. Have a second bucket ready as your rinse bucket for your hands and tools when you’ve finished creating for the day.
You will also need water at the end of your studio time to wipe down all surfaces and wet mop any floors if they have clay on them. When ceramic clays dry, they become airborne which can become unsafe to breathe in. Always work with moist clay and clean up wet as well for your protection.
3. Sponge
Sponges are such handy things to have around the studio, and I recommend grabbing more than one. You can use them for cleaning of course, but they are also excellent little tools for smoothing or polishing up your ceramics! If you decide to throw pottery on a potter’s wheel, you can throw using sponges or use them to wick extra water out of the bottom of your vessel. Elephant ear sponges are great for smoothing, Mud tools also makes wonderful clay sponges with varying absorbency and textures for different stages of pottery.
4. Rib Tool
Rib tools are such a good idea to add to your toolbox! These tools are usually made of wood, steel , or rubber. They are used as straight edges to shape pieces of pottery, usually on the wheel. Honestly, they can be used for all sorts of things: hand building, compression, and wheel throwing specific forms. My favorite rubber ribs are from Mud tools and you can find them Mud tools rib “>here.
5. Loop Tool
Loop tools are very important tools as well, especially if you plan on working on the potters wheel. Whenever you throw something, you will often have excess clay somewhere on your form. If you throw a cylinder cup, for instance, but want it to have a foot ring, you will need to use a loop tool to carve that foot ring out. You can use loop tools to carve out any clunky areas of your wheel thrown pieces, much like carving wood on a lathe. People also use these tools in different sizes to carve out handles from slabs of clay.
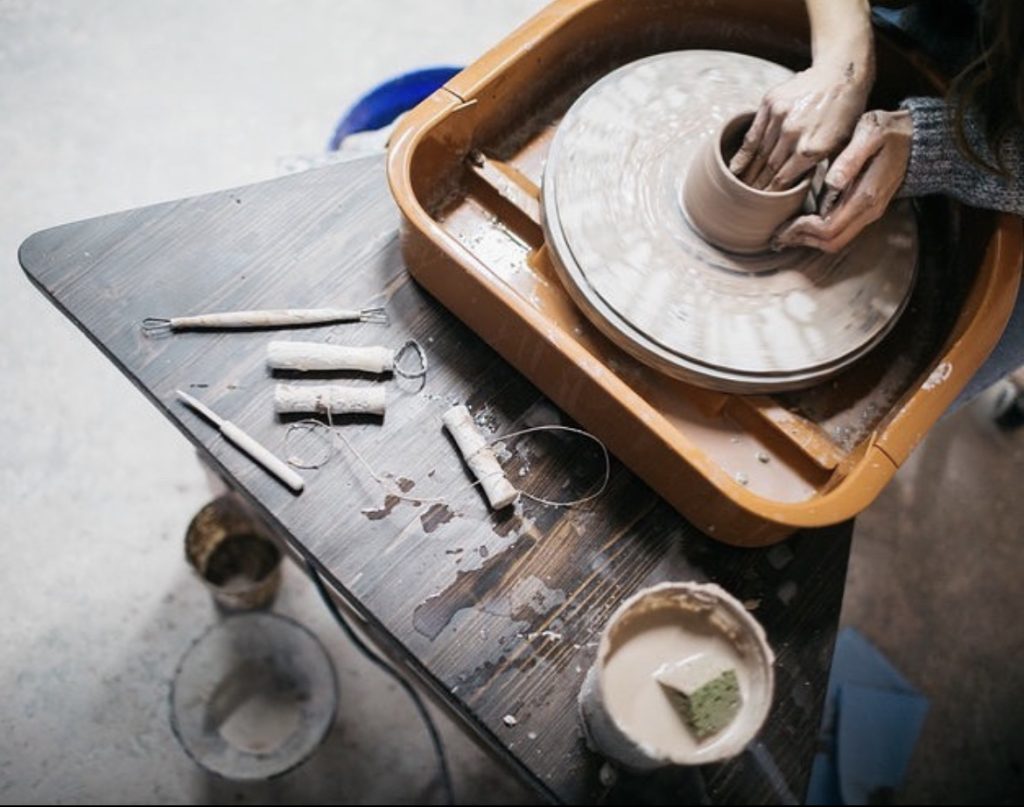
6. Pottery Wheel
If you plan on wheel throwing pottery, you’re obviously going to need a pottery wheel. This is a pretty substantial tool to purchase and the cost reflects that, but don’t let that discourage you! When I fell in love with pottery, I definitely didn’t have a new wheel in my budget. My husband just happens to be innovative (and a nerd) and MADE one out of a recycled motor and a few parts from the ceramic supply store. If a new wheel is in your budget, many potters love Shimpo wheels. You are not limited to store bought only. There are also many studios around that allow you to rent time on a wheel until you can afford your own. If none of those options interest you, try your hand at, well, hand building!
7.Rolling Pin
Rolling pins aren’t just for the kitchen anymore! They are just as handy in the ceramics studio and can be used to roll out slabs of clay for hand/slab building. There are heftier, industrial tools called slab rollers that is used for this as well. They are metal rollers that you set to a desired thickness. You roll your clay through it for a slab with a consistent thickness. Like the potter’s wheel, this usually comes at an industrial price so many potters use a simple rolling pin. Personally, I prefer the wooden rolling pins that are all one piece. You get a better grip and seem to have more control than when using the ones with the moveable wooden handles.
8. Wire Clay Cutters
When wheel throwing, you’re going to need a way to cut your pottery off of the wheel- enter wire clay cutters. This tool is essentially a piece of wire with plastic or wooden handles. You carefully wrap the wire around the bottom of your thrown piece and pull the handles towards you to cut it off. Xiem tools makes a nice wire cutter with fancy plastic handles, but the cheaper wooden handled ones work fine too. This is one of those tools that you will probably need multiple of because after some wear and tear, they will need to be replaced.
9. Bat or Bat System
While we are on the topic of wheel throwing, you are going to need a bat (or several) to throw your pottery on. A bat is a disc that connects to the pin heads on your potter’s wheel. It allows you to remove what you’ve thrown without distorting it’s shape. Some bats are plastic while others are a wood composite or plaster. You can get them in different sizes depending on the size of your wheel head and the spacing of its pins. Some people like to use a bat system which is a single bat with multiple removable inserts. Dirty girls makes a great bat system and I loved using it when I was into production pottery!
10.Kiln
The final major tool you’re going to need in ceramics is a kiln. This is the oven, essentially, that you use to bake your pottery in. These ovens reach temperatures of thousands of degrees to make your pottery functional. Kilns are pricey as well, but you can often rent kiln space at your local potters coop or find a good one secondhand! If you have got the budget for one, I love Skutt kilns. When choosing a kiln, keep in mind the temperature or cone that you plan to fire to as well as the dimensions of the inner kiln chambers as that will limit your scope of work.
With just a few simple tools, you can really dive into the world of ceramics. There are always other gadgets out there for you to use in this craft,but these are the nitty gritty things to get you going on your way.
Happy potting!